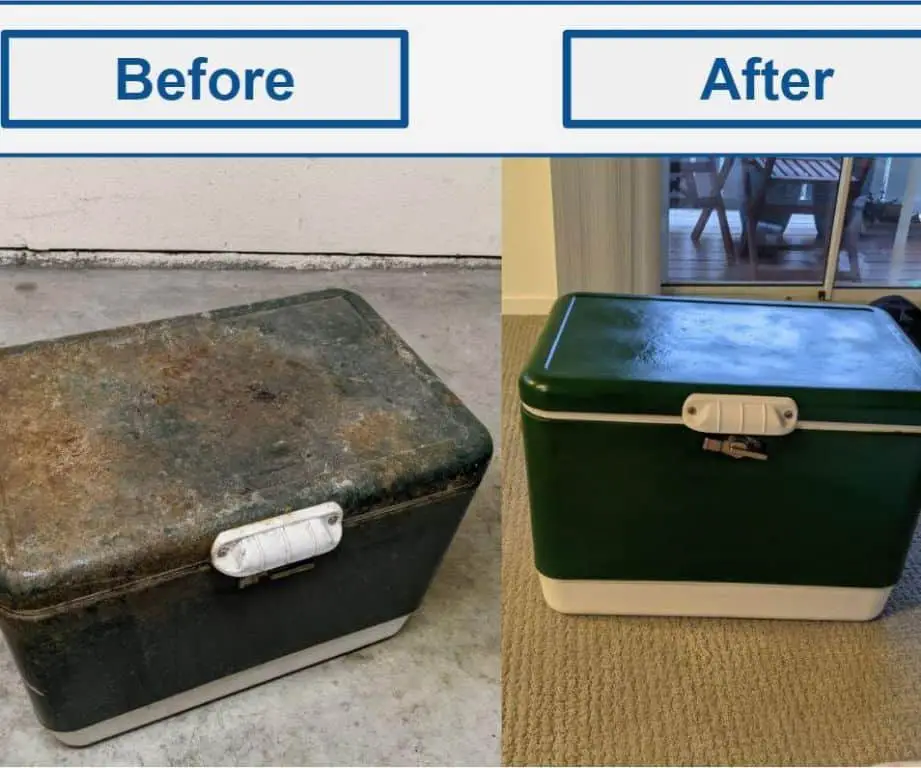
Restoring a vintage metal cooler can seem like a daunting task, but with some time and effort, you can bring an old, rusty cooler back to life. Vintage metal coolers have a certain nostalgic charm that makes them worth fixing up. Follow these steps to restore a vintage metal cooler to its former glory.
Assess the cooler’s condition
The first step is to thoroughly inspect the vintage cooler to identify any issues that need addressing. Check for:
- Rust spots – Look inside and out for any rust. This can range from surface rust to deep pits.
- Dents or dings – Note any dents, especially on the corners or edges.
- Paint condition – Determine if the original paint is intact or flaking off.
- Hardware – Make sure handles, hinges, latches are present and functional.
- Insulation – If possible, inspect inside to see if insulation is damaged.
The amount of rust and paint damage will determine how much work is needed overall. Deep rust pits or large sections of missing paint call for more extensive repairs.
Remove rust
Removing rust is crucial before painting. Here are some options for getting rid of rust:
- Wire brush – Use a coarse wire brush attachment on a power drill. This works well for surface rust.
- Sandpaper – For smaller spots, sand by hand using 100-150 grit sandpaper.
- Sandblasting – For deep rust pits, sandblasting completely strips the metal to bare metal.
- Chemical rust removers – Rust removing solutions like phosphoric or oxalic acid can be brushed on and rinsed off.
- Naval jelly – This chemical rust remover clings to metal and needs scrubbing off.
Sandblasting gives the most thorough results but also takes off any good existing paint. Hand sanding with an orbital sander is gentler.
Spot clean any oily or greasy residue with degreaser once the rust is removed. Then rinse and let dry fully.
Repair dents
For small dents, use the following techniques:
- Rubbing – For shallow dents, rub out through layers of cloth.
- Suction – Use a plunger or suction cup to pull dents out.
- Dry ice – Freeze large dents by holding dry ice on them, then use a mallet to gently tap out.
For severe dents that affect the structure, you may need to have a body shop work on the metal cooler.
Prepare the surface
Once all rust is removed and dents repaired, prepare the metal surface for new paint. Steps include:
- Wash with soap and water.
- Rinse thoroughly and let dry.
- Wipe down with mineral spirits or cleaning solvent like acetone.
- Sand smooth with 120-220 grit sandpaper.
- Vacuum and wipe away all sanding dust.
- Apply metal primer according to manufacturer instructions.
The cleaner and rougher the surface, the better the paint will adhere.
Paint
Use spray paint formulated for metal when painting a vintage cooler. Enamel paint provides a durable and smooth finish. Sand lightly between coats for best results.
Here are the steps for spray painting:
- Position cooler on cardboard or drop cloth in a well-ventilated area.
- Shake can vigorously for 1 minute.
- Hold can 6-8 inches from surface. Start spray before and after each coat.
- Apply multiple thin coats rather than one thick coat.
- Allow proper drying time between coats according to directions.
- Add final clear enamel coat for extra protection.
If there are badges, brand names or logos on the cooler, carefully mask them off before painting.
Replace hardware
Over time, the hardware on vintage coolers can wear out or go missing. Here’s what may need replacing:
- Hinges – Soak rusty hinges in WD-40 or replace if broken.
- Handles – Replace broken or rusted handles with similar style.
- Latch assembly – If missing, find a replacement vintage latch.
- Drain plug – Replace a leaky drain plug with a new rubber gasket plug.
Try to find hardware replacements that closely match the original parts. This will help maintain the vintage look.
Line the interior
Replacing the interior liner will make the cooler useable again. Measure the dimensions of the interior walls. Then cut sections of insulating foam to fit snugly inside. Use adhesive to hold in place. You can also glue on a new layer of plastic or metal sheeting.
Seal and finish
The final steps complete the restoration:
- Caulk – Use clear silicone caulk on interior seams and edges.
- Weatherstripping – Replace worn or cracked rubber seals around lid.
- Clear coat – Apply a clear enamel spray paint over the entire cooler for an extra protective layer.
- Touch up paint – Dab on touch ups over any chips or scratches.
Take time with the finishing details to make your restored vintage cooler look its best.
Conclusion
Restoring old metal coolers requires work but brings these nostalgic items back to usable condition. With some elbow grease and the right techniques and materials, you can remove rust, repair dents, repaint, and replace hardware to revive a vintage gem. Take satisfaction in preserving a piece of history when you restore your own metal cooler.
| Task | Description |
|---|---|
| Assess condition | Inspect inside and out for rust, dents, paint damage |
| Remove rust | Use wire brush, sandpaper, sandblasting, rust removers |
| Repair dents | Rub out, use suction, tap with dry ice and mallet |
| Prepare surface | Wash, sand, apply primer |
| Paint | Spray paint formulated for metal in thin coats |
| Replace hardware | Hinges, handles, latches, drain plugs |
| Line interior | Insulating foam panels and plastic or metal sheeting |
| Seal and finish | Caulk, weatherstrip, clear coat, touch ups |
